home | what's new | about sven | design & illustration | model gallery | videos | sven's rides | studio tour | links
|
|
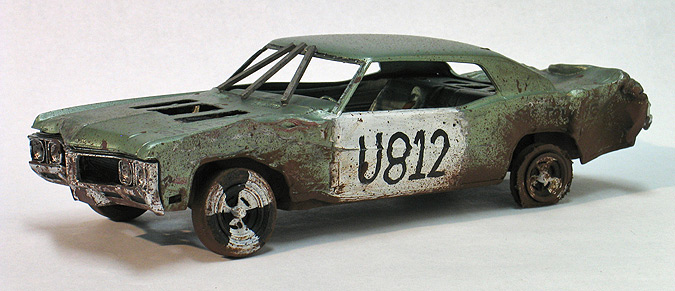
1970 Buick Wildcat demolition derby car - (built 2007 :: Buick build #3 of 5)
For the my third built version of the Model King '70 Buick, I thought it would be fun to break out of my normal building habits and try something I've never built before. Growing up in Ohio, going to the county fair every summer has always been a family ritual. One of my favorite things to do at the fair is watch the annual demolition derby. My kids and I really enjoy watching the old iron battle it out to see who can last the longest. So, I thought it would be fun to try and replicate one of these warriors and the big Buick seemed like a perfect kit for it.
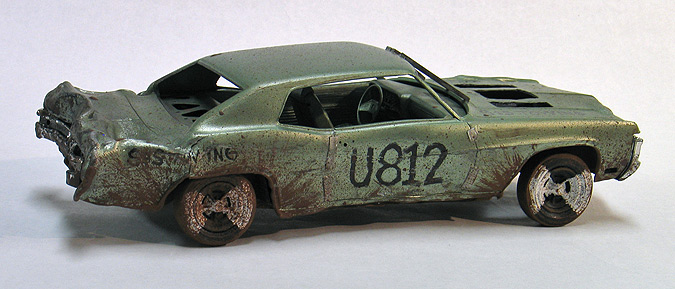
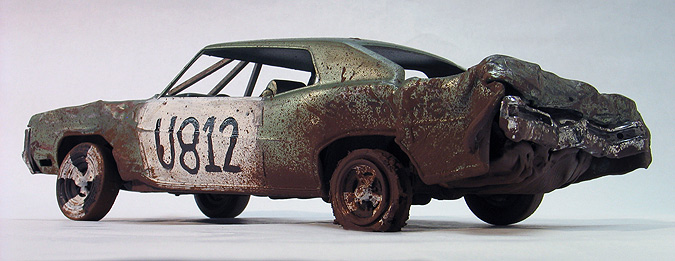
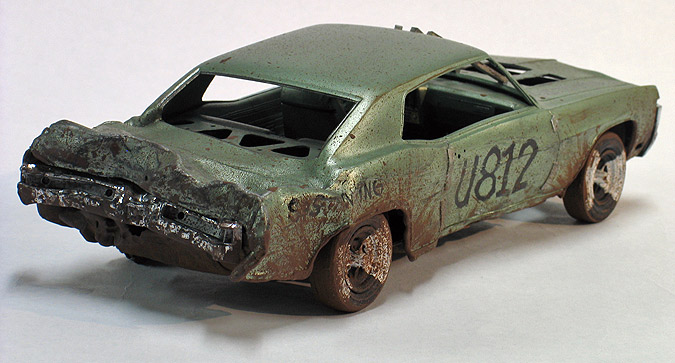
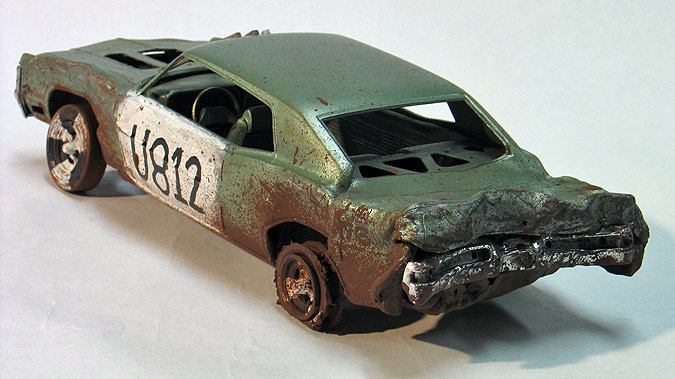
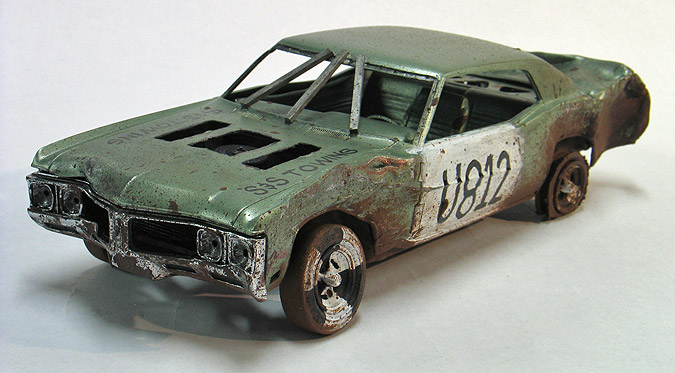
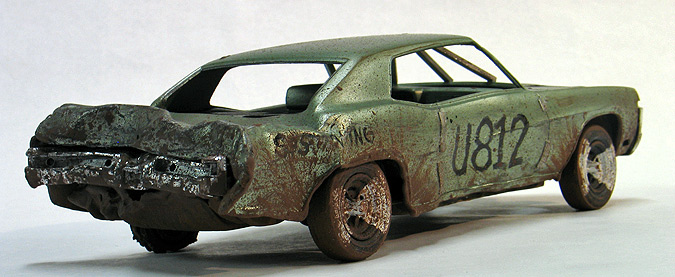
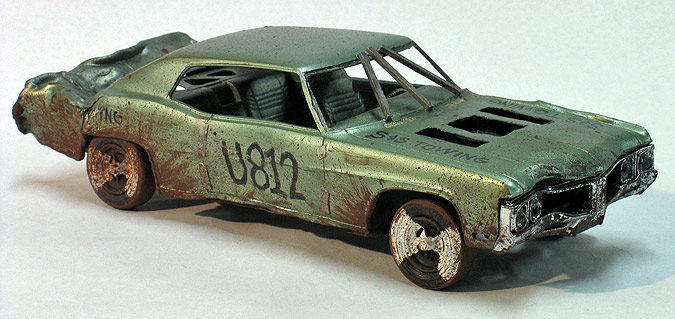
To get started, I checked out a couple of demo derby web sites and looked at how these cars are normally modified. It seemed like different organizations had different rules for competition. Rather than worrying too much about the accuracy of rules, I decided to just build what I thought would look right. With some reference in hand, I started modifying the body. First, I sanded off the door handles and some other trim. Next, I drilled out door locks and the side marker lights. A lot of demo derby competitors cut open holes in the hood to help prevent the engine from over heating. I cut some really ragged looking holes in the hood to make them look like they were cut in a hurry with a torch. I then thinned down the under side of the hood with a Dremel tool to make the plastic hood have more of a scale thickness. I also ground out the grill and headlights on the front bumper. I also ground off the windshield trim and drilled some tiny holes around the frame to make it look like the wind shield had been removed. Lastly, I added safety beams to the windshield and plates welded over the doors, all made from sheet styrene. I was now ready to create the battle damage. I wanted to create a car that had looked liked it had been well battered but not to the point of being unrecognizable. Using a lighter, (kids don't try this at home) I heated the plastic until it was soft enough to bend. Working slowly as to not melt the plastic, I bent various areas on the body until I had the look I wanted. I left the driver's door alone because hitting a competitor there is a no,no. Then I bent the chassis and bumpers to match the body.
For paint I wanted it to look like somebody had purchased a well used old car and then entered it in a demo with little prep work. I looked at the paint chip book for 70 Buicks and decided on a "grandma green" factory metallic color. I custom mixed an automotive urethane paint to match my sample and then sprayed it on the body. I then sprayed it with a dull coat to look like it was old faded paint. I then sloppily brush painted the drivers door with a semi-gloss white to make it like it had been done in haste with some house paint. Lastly, I added the numbers and a fictional sponsor name to the hood and quarter panels.
The interior was also modified by removing the passenger seat and adding a relocated battery from my parts box. The rear package shelf was also modified to look like the panel was removed and bare metal exposed. With holes in the hood it would have looked pretty empty without a motor so I again dug through my parts box and found a suitable GM motor which I dropped into the chassis. At the same time I also added a radiator core behind the grill opening. I also made a set of zoomie style exhaust pipes that I had originally planned to have sticking up through the hood. After I mounted them though, I thought they made the car look like a Road Warrior reject, so I got rid of them. I also put all the tires on a lathe and sanded them down to look like they had been well used. Here, I decided to add a little extra detail and make one of the tires look like it had blown and was shredded. Since the kit tires are solid, I used a hollow tire from the parts box and cut the tire in half. I ground the pieces down with a Dremel and then mounted the pieces on a rim to replicate the flat tire. It's also common for drivers to add spacers in the springs so the car will sit up higher and won't sink in the mud. I modified the axles so the car would sit up higher and then bent the left front wheel inward to look like it had been hit.
After assembly, I then added more scrapes & scars using a variety of pastel chalks and acrylic paints. The final step was adding a healthy splattering of mud which I made by thickening some brown acrylic artist paint with talcum powder and then flicking it on the car with a stiff toothbrush. I think the hard part here is to be subtle with all the weathering and not over do it. Overall, it was a fun project and added something different to my collection.
|
|